Nexus manual · Operating
CW
The CW cockpit is a casual/ragchew CW station in software. It is deliberately scoped: you key every message yourself — there are no contest serials and no auto-sequencing. What it gives you is a keyboard keyer with F-key macros, a live CW decoder so you can read the other station, on-the-fly speed control, a zero-beat scope, and your license privileges enforced — so you can call CQ and hold a conversation without a paddle and without copying by ear if you’d rather not.
CW ships enabled — the wizard turns everything on; there is no mode picker to miss it in. No goal profile enables it, though, so if you pick one in Settings ▸ Appearance ▸ Features, switch CW back on there — or take Everything (expert), which includes it.
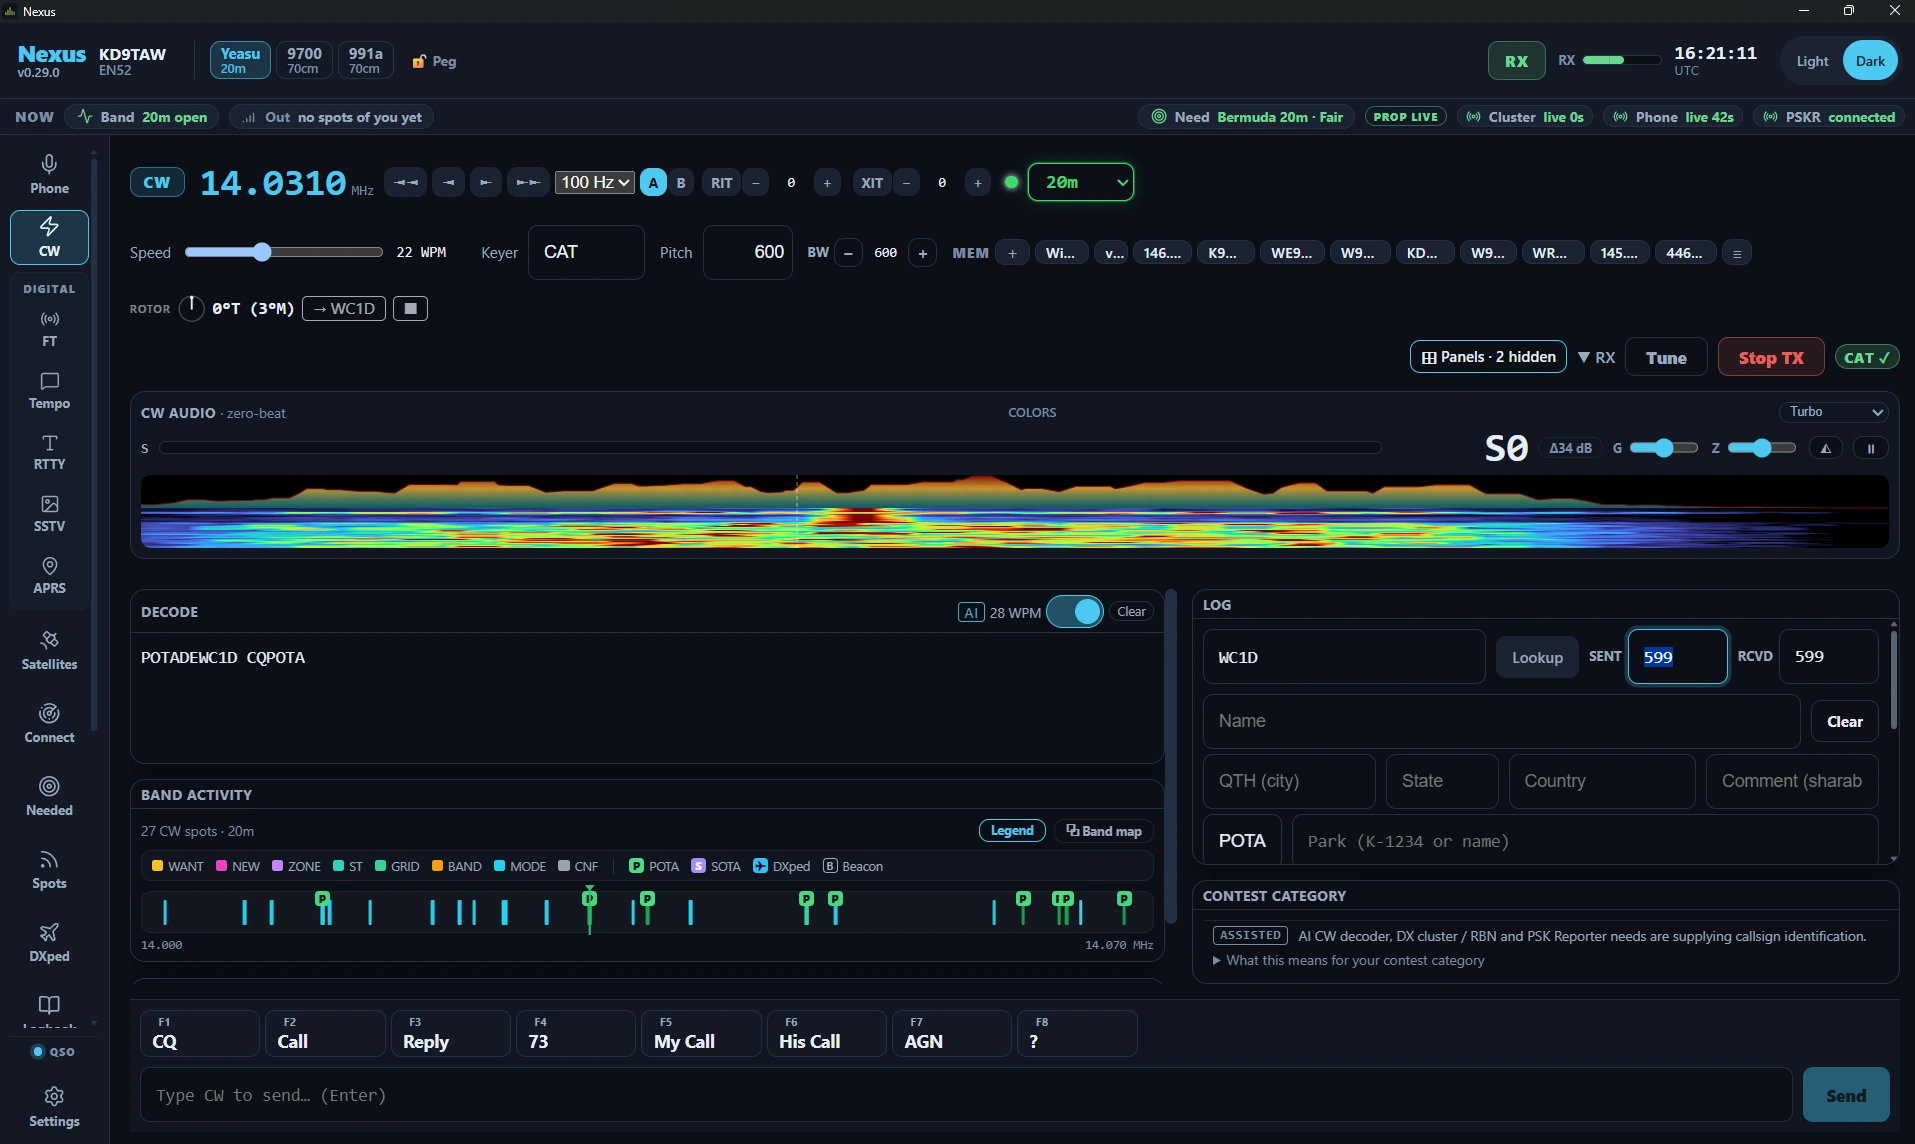
The tour
Keyer back-ends. Four ship, on the header’s Keyer dropdown. Hovering the dropdown explains the one you are keying with; each entry in the list carries its own explanation, so you can read the others before you switch:
-
CAT — the rig generates the Morse (Hamlib
send_morse), with speed pushed over CAT. Zero extra hardware; needs a rig that supports CW keying over CAT. -
Serial — Nexus toggles DTR or RTS into the rig’s KEY jack and the rig shapes the signal (rig in CW). This is the N1MM/fldigi method for a rig with no CAT keying command. Set the keyline port and line in Settings ▸ CW.
-
WinKeyer — a K1EL WinKeyer hardware keyer over serial (rig in CW). It’s the no-ambiguity option: real hardware timing, nothing to route. Set its serial port under WinKeyer port in Settings ▸ CW.
-
Soundcard — Nexus synthesizes PARIS-timed, click-free Morse (5 ms raised-cosine envelopes) through the TX audio path, for rigs without a CW keyer command. This is the workaround, not the clean path: it works only if Nexus’s audio output is routed to the rig (as for FT8) and PTT works, and you must keep drive below ALC — otherwise it looks like it’s sending and nothing reaches the air. This path takes the radio out of CW, into a data mode (DATA-U/DATA-L) — the same mode FT8 uses, and for the same reason: on the common Icom and default-Yaesu wiring, plain SSB takes its transmit audio from the MIC socket, so the rig would key and radiate nothing. CW mode comes back when you pick another keyer. If your interface feeds the rig’s mic jack instead of its data input, tick plain SSB for data modes on that radio in Settings ▸ Radio and this path uses plain SSB for you, exactly as it does for FT8.
On a Yaesu FTX-1, CAT keying is flagged as unproven where you pick it: its Hamlib backend sends a different keying command from the one other radios use and reports success either way, so if nothing goes out Nexus cannot tell you. It is a notice, not a block.
The CW decoder. The AI decoder is the default: a neural net (the DeepCW model by e04) reads the whole 400–1200 Hz window rather than one pitch, which is what makes it copy a station you have not zero-beat and hold on through QSB. The switch beside the AI badge in the Decode pane’s title bar turns it off and falls back to the classic single-pitch decoder, which reads only the tone at your marker. Either way you get a running transcript that persists as text scrolls by, the decoded WPM beside it — leave WPM on auto and the keyer follows the station’s speed — and a Clear button that wipes the decoded and sent transcripts together. A Copilot pane shows the decoded callsigns as chips; click one to make that station your worked peer.
Speed. WPM runs 5–50 (default 25). Nudge it on the fly with PgUp / PgDn (±2 WPM, hold Shift for ±4).
The AF scope is a narrow 300–1100 Hz display with a hairline drawn at your sidetone pitch, so you can zero-beat a station by ear and eye.
The zero-beat light goes further: Nexus measures the tone actually coming in and tells you where it sits against your pitch. A light comes on when you are on pitch, and beside it a needle and a signed offset in Hz say which way and how far off you are — being 80 Hz out no longer looks the same as being 400 Hz out. How close counts as on pitch follows your rig’s CW filter: 25 Hz behind the usual 500 Hz one, tighter behind a narrow filter. With several signals in the passband it follows the one nearest your marker rather than the loudest, so it does not jump to a strong station 300 Hz away while you are closing in.
On a dead band it goes quiet and stays quiet. A reading only appears once a tone has held the same frequency long enough to be a signal you are tuning rather than the loudest thing the receiver happened to hear — otherwise the needle would twitch at band noise between overs. That costs about a fifth of a second before a new signal shows, and the wait is paid when a station starts sending, never between their letters. It is a display only: it never touches your dial.
⊞ Panels in the header shows and hides the panes under the scope, and an entry with nothing on screen behind it right now says why in a line under it — it stays keyboard-reachable and reads that reason with the panel name. Scope Controls command the radio’s own panadapter, so they appear only while an Icom CI-V or FlexRadio scope is streaming; DSP Toggles and RX DSP Levels offer only what your radio reports over CAT. Those three draw inside one Rig controls card and sit on a single row at the default width, which is one title bar and one border instead of three — they are still three separate menu entries, each switching its own group and explaining itself when your radio cannot feed it. Sent Echo holds what you have transmitted this session, so it is empty until your first over; TX Meters read on transmit. The line explains the screen; the tick is still yours — untick Sent Echo at start-up and it stays away after your first over, rather than making you transmit before you can hide it. Once you have unticked an entry its line goes with it: the pane is off your screen because you said so, not because of anything the rig is doing. Esc closes the menu and puts focus back on the ⊞ button. See Phone for the same menu on the voice side.
What the cockpit gives room to. The Decode transcript is the pane a CW operator works from, and it is the one the layout grows: everything beside it — the Sent echo, Rig controls, Band Activity, the Copilot — is exactly as tall as what it holds, and the transcript takes the rest. There is a floor under it, so a column full of control strips can no longer starve it toward nothing. At the window Nexus opens at that comes to four lines of copy with one short drag left to scroll; on a wide window the aux panes get a column of their own and the transcript keeps the whole gain. The leading column scrolls when it stands taller than the space it has, so a control never renders past the edge. Stop TX, Tune and Esc sit outside the pane region — no layout you save can put them out of reach.
Macros
Eight F-key macros cover a normal ragchew, in the order you’d send them:
| Key | Label | Sends |
|---|---|---|
F1 | CQ | CQ CQ DE {MYCALL} {MYCALL} K |
F2 | Call | answer a CQ with just your call (so they copy it — no report yet) |
F3 | Reply | your report + name, once they’ve come back to you |
F4 | 73 | sign off (TU 73 SK) |
F5 | My Call | {MYCALL} |
F6 | His Call | the worked station’s call |
F7 | AGN | AGN AGN |
F8 | ? | a bare ? |
Macros expand {MYCALL}, {NAME}, {RST}, and his-call tokens, and 599 is
cut down to 5NN automatically. Set your operator name (for {NAME}) in
Settings ▸ Station.
Core workflows
Keying backends, and what each one puts the rig into
Entering the cockpit commands the rig’s mode for you, and which mode depends on the keyer you picked. Three of the four leave the rig in CW and let it shape the signal; the Soundcard backend plays an audio tone, so it needs the rig on the SSB side in a data submode — the same reason FT8 does.
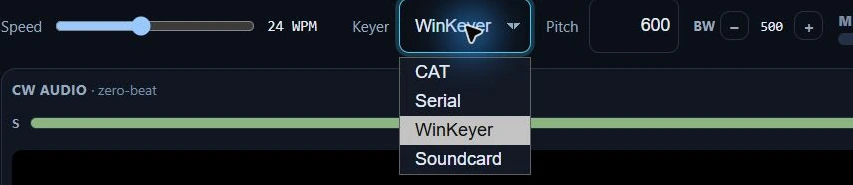
The four keyer backends in Nexus 1.10.3. Each entry in the list explains itself on hover, so you can read the others before you switch.
| Keyer | What makes the Morse | Mode Nexus commands | Does Nexus key PTT? | TX audio | Extra setup |
|---|---|---|---|---|---|
| CAT | the rig’s own keyer (Hamlib send_morse, fed one word at a time) | CW at 30 m and up, CW-L (Hamlib CWR) on 160/80/40 m | no — the rig keys itself | not used | none |
| Serial | the rig, keyed by DTR or RTS on its KEY jack | same as CAT | no — the rig keys off its KEY line | not used | Keyline serial port and Keying line in Settings ▸ CW |
| WinKeyer | a K1EL WinKeyer over serial | same as CAT | no — the keyer and the rig handle it | not used | WinKeyer port in Settings ▸ CW |
| Soundcard | Nexus, as a keyed audio tone | DATA-U at 30 m and up, DATA-L on 160/80/40 m — plain USB/LSB only if plain SSB for data modes is ticked for that radio | yes | yes — the same TX audio path FT8 uses | your PTT method, plus Nexus’s audio routed to the rig and drive under ALC |
The 10 MHz split is the ordinary CW and sideband convention: below it the lower side, above it the upper. It is the same rule the Phone cockpit follows, and it is why a rig on 40 m lands in CW-L rather than CW-U.
When nothing goes out, the cockpit names the backend that failed rather than leaving you guessing:
- CAT — “Your rig didn’t accept CAT CW keying (Hamlib
send_morse).” Many Hamlib backends serve frequency, mode and PTT but not keying. Move to WinKeyer or Soundcard. - Serial — the operating system’s own error on the port, verbatim, with the reminder that CAT or another program may be holding it.
- Soundcard — “the rig didn’t accept PTT”. Audio-routing faults cannot be detected here: a tone that plays locally while the rig is in plain SSB on a data-input interface radiates nothing, and looks identical to a good send.
- On a Yaesu FTX-1, CAT keying is flagged unproven where you pick it: its Hamlib backend sends a different keying command from the one other radios use and reports success either way, so a silent failure cannot be reported. It is a notice, not a block.
Call CQ and work an answer
- Set your band and frequency. Entering the cockpit commands the rig’s mode for you — CW (CW-L below 10 MHz) on the CAT, Serial and WinKeyer keyers, a DATA submode on the Soundcard keyer. See the table above.
- Press
F1to send CQ. - When someone answers, type or click their call into the his-call field, then
run
F3(report + name) →F4(73) as the QSO progresses. You send each over — nothing fires automatically. Escaborts keying instantly: it clears the queue and stops the rig.

The macro row and the typed buffer in Nexus 1.10.3. Enter sends what is in the field, and it queues behind whatever a macro is already sending.
Read the other station
- Watch the transcript fill in, with the decoded WPM beside it. Leave WPM on auto and the keyer matches the station’s speed for you. With the AI decoder on you do not have to zero-beat first — it reads the whole 400–1200 Hz window.
- If you turn AI off, the classic decoder reads only the tone at your marker, so zero-beat the station you want using the AF scope’s hairline.
- Clear wipes the decoded and sent transcripts together and re-pins both to follow the next copy, even if you had scrolled up.
- Click a decoded-call chip in the Copilot to make that station your worked peer — it fills the his-call token in your macros and the Log pane.

Decode and Copilot in Nexus 1.10.3. The WPM beside the AI badge is the speed read off the air, not a setting. The Copilot’s first chip is its best candidate for the call and the two after it are the near-misses it also considered.
Land here from the Needed board
Click a CW row on the Needed board and Nexus QSYs to the spot and opens this cockpit with the callsign already typed in the Log pane, ready for your first over. The Log pane pre-fills CW / 599.
Honest limits
- The decoder prints one transcript, not a skimmer’s rows. The AI decoder reads the whole 400–1200 Hz window, but everything it copies lands in the same running text — it does not split two stations into two columns the way a full-band skimmer does. Expect ordinary machine-copy behavior either way: clean sending decodes well, heavy QSB and swamped signals less so. The classic decoder is narrower still, reading only your marker pitch.
- The AI model ships as an app resource (DeepCW, AGPL-3.0, © e04). A build without it says so in the pane and the classic decoder carries on — nothing else in the cockpit is affected.
- Unassisted mode turns the AI decoder off, whatever the switch says, because a declared unassisted entry means no machine copy. That is the one case where the AI decoder is silent with the setting still on.
- No contest exchanges or serials — this is a casual keyboard station by design. (Contest exchange modes aren’t built.)
The license-class gate blocks keying outside your segment — including the Technician CW-only segments on 80/40/15 m. Set your class in Settings ▸ Station.
Related guides
- Phone (SSB)
- RTTY — the other type-it-and-send-it mode, with its own F-key macros and live decoder
- Memories — the bank behind this cockpit’s MEM strip
- Operate — FT8/FT4 digital
- Needed — DX that’s on the air now
- Settings reference
This page is synced from docs/guide/cw.md in the Nexus repo. Corrections belong there.