Nexus manual · Start here
Quick Start — your first FT8 QSO in 15 minutes
This is the short path from a downloaded installer to a logged contact. The install step below is written for Windows; macOS, Linux and Raspberry Pi take the same path from step 2, and Install & Verify covers them all. It assumes a radio with a USB (or network) connection and a working antenna. Everything here is also covered in more depth in the user guide — this page is the fast lane.
By the end you will have Nexus installed, your station and rig set up, a cockpit full of live decodes, and one FT8 QSO in your log.
Nexus left beta at 1.0.0. The FT8/FT4 core is built to WSJT-X’s behavior and exercised on the air daily; it is the production part of the app. Where a number still comes from the bench rather than the air, these pages say so, and field reports are what close that gap.
1. Install and get past SmartScreen (about 3 minutes)
Download the file for your platform — Nexus_<version>_x64-setup.exe on Windows,
Nexus_<version>_aarch64.dmg on a Mac with Apple Silicon,
Nexus_<version>_amd64.AppImage or Nexus_<version>_pc_amd64.deb on Linux,
Nexus_<version>_pi_arm64_bookworm.deb / ..._trixie.deb on a 64-bit Raspberry Pi —
from the
SourceForge download page
(the source lives there too).
It is a per-user install and needs no administrator rights. WebView2 (Windows) and Hamlib
(every platform) are bundled, so there is nothing else to install.
Full detail, including SHA-256
verification and where your data lives, is in Install & Verify.
Run the installer. Because the Windows and Linux binaries are cross-compiled and unsigned, Windows SmartScreen shows a blue “Windows protected your PC” dialog. This is expected. Click More info, then Run anyway. The macOS DMG is signed and notarized, so there is no Gatekeeper hoop — open it and drag Nexus to Applications (run it from Applications, not from the disk image).
If you would rather verify the download first, the release page publishes a
SHA-256 for each installer — see Install & Verify.
2. The first-run wizard (about 4 minutes)
On first launch Nexus opens a four-step wizard: Station → Rig → Log → Finish. Every step is skippable — I’ll set it up myself closes it wherever you are — and everything it sets can be changed later in Settings.
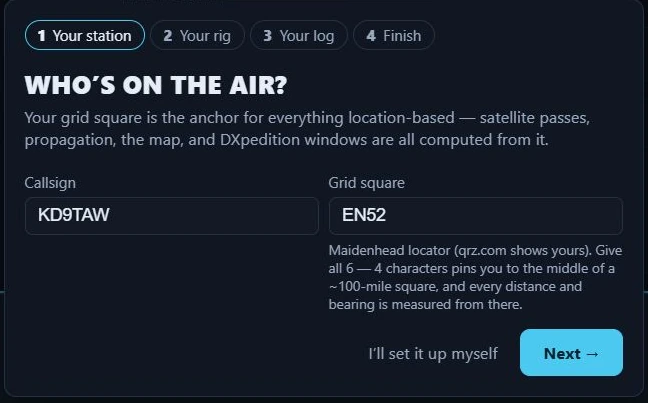
On a clean install the wizard opens by itself, with empty fields. On a machine that is already set up it does not reappear: reopen it with Re-run setup wizard…, under Setup health in Settings ▸ Radio. Re-running it edits in place — your callsign, radio and log come with you and nothing is lost — which is why the fields in the captures below already hold a station.
Step 1 — Your station
Enter your callsign and grid square. The grid is the anchor for
everything location-based: the propagation map, satellite passes, DXpedition
windows, and the range rings all compute from it. The field takes four or six
characters and turns red on anything that isn’t a valid Maidenhead locator —
but give it all six, which is what the app asks for under the box: four
(EN52) only pins you to the middle of a ~100-mile square, and that centre is
where every distance and bearing is then measured from.
Step 2 — Your rig
Plug in the radio, power it on, and click Detect my radio. One scan does two things at once: it enumerates USB devices and looks for FlexRadios on your network. What you see depends on the radio:
- A named USB rig (Icom IC-705 / IC-7300 class, and other radios that report their model in the USB descriptor) shows up as a row like “IC-7300 on COM4” — one click fills the Hamlib model, serial port, and paired audio device together.
- A bridge-chip cable (CH340, FTDI, CP210x, or Prolific reporting only “USB Serial”) can’t tell Nexus what radio is on the far end. The row fills the port and audio and names the chip, but leaves the model blank — pick your rig from the dropdown. If Windows is missing the chip’s driver, Nexus shows the download link.
- A FlexRadio on the LAN shows up as “FLEX-6400 on the network”. One click
configures the WSJT-X-proven path — CAT through the SmartSDR CAT app on this PC
(
127.0.0.1:5002, slice A) — and offers a ⚡ Pair DAX audio button for the virtual audio devices.
Then click Test CAT. Nexus saves what you’ve entered, starts its bundled
rigctld, and reads back the dial frequency. A number like 14.074 MHz means CAT
is working, and the Setup health strip at the foot of the step turns its Rig,
RX audio and TX indicators over to what it actually found. If it fails,
Troubleshooting → CAT walks through the
usual causes.
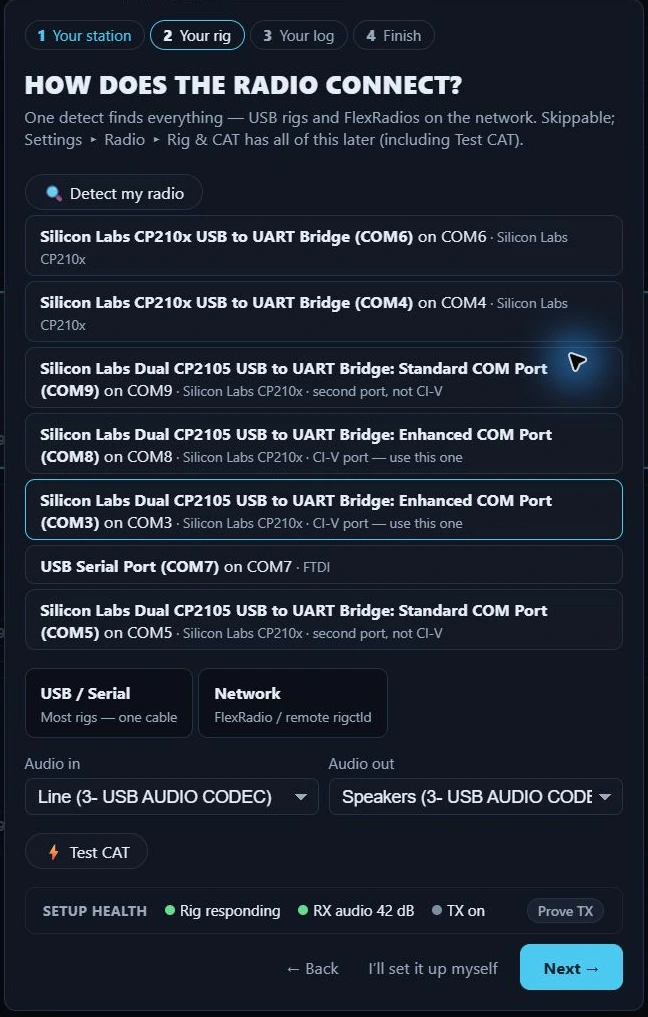

A station that is actually working, in Nexus 1.10.3. The dB figure is this station’s own; anything from about 15 to 70 decodes, and 0 means no audio is arriving at all.

The same strip with nothing connected. Rig not answering is CAT — wrong port, wrong baud, or the cable; hover the light for the radio’s own reply, then fix it here and press Test CAT again. RX audio error is the input device refusing to open, usually because another program holds it. Fix the rig first: on a one-cable interface the audio device is part of the same radio.
Step 3 — Your log
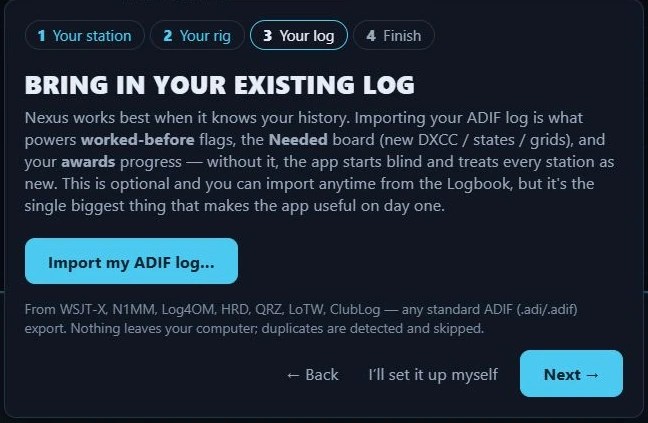
Import my ADIF log… reads any standard ADIF (.adi / .adif) export —
WSJT-X, N1MM, Log4OM, HRD, QRZ, LoTW, ClubLog — and that history is what lights
up worked-before (B4) flags, the Needed board’s new-DXCC / new-state /
new-grid calls, and your awards progress. Skip it and the app starts blind,
treating every station on the band as new.
The import is local: nothing leaves your computer, and duplicates are detected and skipped. The step is optional and you can import at any time from the Logbook — but it is the single biggest thing that makes the app useful on day one.
Step 4 — Finish
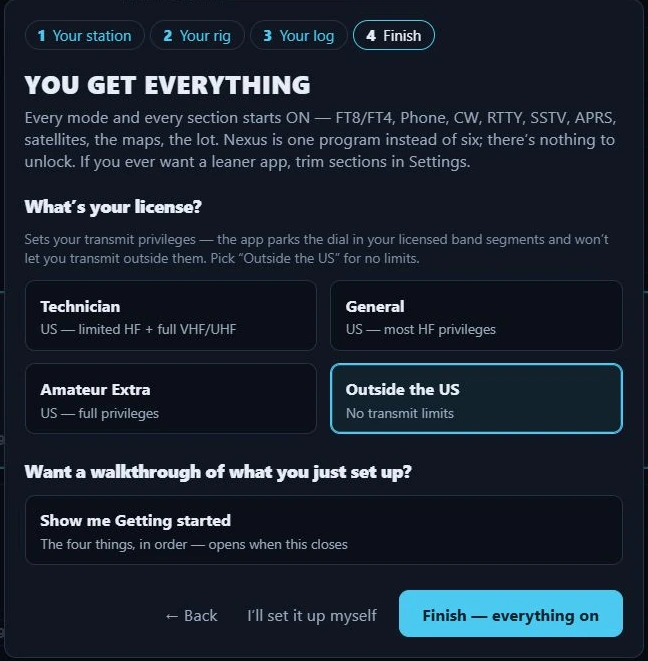
There is nothing to unlock: every mode and every section starts on — FT8/FT4, Phone, CW, RTTY, SSTV, APRS, satellites, the maps, the lot. If you would rather run a leaner app, sections come off one at a time afterwards in Settings ▸ Appearance ▸ Features, which is also where the goal profiles — getting started, DX/awards, contesting, POTA/SOTA, 6m/VHF, and Everything (expert), which turns the whole console back on — set a batch of sensible defaults in one pick. Toggle features by hand and the profile reads Custom.
The one thing this step asks for is your license class: Technician, General, Amateur Extra, or Outside the US for no limits. This becomes a real Part 97 transmit lockout — the app parks the dial in your licensed band segments and refuses to key outside your privileges, including the 2026 60 m rules. It’s a safety net, not a substitute for knowing your license, and it is yours to declare: the card outlined in the capture below is the state of that station, not a recommendation.
Show me Getting started queues the four-things walkthrough to open as the wizard closes. Click Finish — everything on, and Nexus drops you into the digital cockpit.
3. A tour of the digital cockpit (about 2 minutes)
Out of the box the dial sits at 14.074 MHz (FT8, 20 m), decode depth is Deep, and the decoder listens across 200–2900 Hz. Decoding runs every RX slot automatically — there is no Monitor toggle to forget.
The three things to know:
- The waterfall across the top shows signal energy over frequency, and carries two independent cursors. Left-click moves the green RX cursor, right-click (or Shift-click) moves the red TX cursor, and Ctrl-click moves both at once — the same legend the pane header prints. The Operate chapter shows it.
- Band Activity is the decode list — newest at the bottom, auto-scrolled to the latest period. Every row carries what stock WSJT-X never showed: the country name, a B4 chip if you’ve worked them before, New DXCC / new-grid badges when a station is worth something to your log, and a teal L if they upload to LoTW. Rows calling CQ, and rows calling you, are flagged. Scroll up to review and auto-scroll pauses; scroll back down to resume.
- The Classic ↔ Roster toggle switches between the familiar stock layout (with the Tx1–Tx6 panel and editable DX Call/Grid) and a modern sortable call roster. Use whichever you like.
The TX controls — TX On/Off · Tune · Stop TX · Hold Tx — sit in the QSO strip next to Call CQ and S&P. Nexus never transmits on its own; TX is always something you switch on.
4. Answer a CQ (about 1 minute of watching)
- Find a station calling CQ in Band Activity.
- Double-click the row. Nexus arms the sequencer, sets your slot parity, and fires the first transmission at the next period. From there it runs the whole exchange for you — grid → report → R-report → RR73 → 73 — advancing on what the other station actually sends back. It locks onto that station, so a report from a bystander won’t derail your QSO.
- Watch the Tx panel to see which message goes out next. That’s it — you’re making the contact while you learn the rhythm by watching.
A single click just fills the DX Call/Grid fields without transmitting.
Esc halts TX instantly. F4 clears the DX call, F6 re-decodes the last period
for a second look.
Two reassurances while you find your feet:
- The license lockout has your back. If the dial is outside your declared segment, the TX button shows a lock and the engine refuses to key — you can’t accidentally transmit out of band.
- The TX watchdog is watching too. After 6 minutes of unattended transmit the engine halts itself, so a walk-away never leaves you keyed down.
5. Logging, and what the Needed board starts telling you
When the QSO completes it is logged automatically (auto-log is on by default), and — once you configure them — pushed to QRZ and LoTW. Your logbook is a standard ADIF file; importing an existing log credits your history immediately.
Four different things, and only one of them is a contact
These get run together everywhere in this hobby, and running them together is how an operator ends up believing their log says something it does not. They happen at different moments, and each moves a different number:
- A decode — you heard a station. Nexus prints it in the roster and, if PSK Reporter is on, sends it up as a reception report: “KD9TAW heard W1AW on 20 m at −14 dB”. Reports go up every few minutes for everything you decode, whether or not you ever call. A reception report is not a contact. It changes nothing in your log — it is a note to the world that your receiver was working, and it is what puts you on other people’s maps. The reverse direction is the same: a station’s spot on PSK Reporter means somebody heard them, not that anybody worked them.
- A QSO — you called, they came back, you exchanged reports and signed. That is a contact, and it is the only one of the four that writes a record in your logbook. This is what moves the worked counts on the Needed board, in Stats and in Awards.
- An upload — Nexus sends that record to LoTW, QRZ, ClubLog, eQSL or WRL. You have now told a service what you did. Nothing is confirmed yet, and the contact counts toward no award. On its own an upload proves only that your half arrived.
- A confirmation — the other operator uploaded a matching record, and the service paired the two. Only now does anything move in the confirmed column, and only LoTW and paper cards count toward ARRL awards — an eQSL or a QRZ match confirms the contact without earning credit. This one is not yours to hurry; it can take a day or a decade, and some contacts are never confirmed at all.
The short version: decodes and reports are about your antenna, contacts are about your log, uploads are about your side of the paperwork, and confirmations are about theirs. Logbook & QSL covers uploads and confirmations properly.
With a callsign and grid set, the Needed board begins ranking every station on the air by what it’s worth to your log — an all-time-new entity outranks a new zone, which outranks a new band, and so on. What makes it trustworthy is the evidence line on every row: who near you heard that station, how far away, and how long ago. Those are other operators’ reception reports — the same kind of thing your own decodes send up — which is what makes them evidence that a path is open rather than a claim that anybody worked it. One click there QSYs the rig to the right band, mode, and frequency and opens the matching cockpit.
Where to go next
You’re on the air. When you want to go deeper, each section has its own guide:
- Operate: FT8 / FT4 — the full click model, split, Hound, directed CQ, and every keyboard shortcut.
- Needed board & hunting — how the ranking and evidence rules work.
- Connect: map & propagation — the globe, opening detector, and band advisor.
- Phone and CW — the voice and Morse cockpits.
- POTA / SOTA and Field Day — hunting and event operating.
- Logbook & awards and Integrations — DXCC/WAS/WAZ math and the LoTW/QRZ/ClubLog/eQSL connectors.
- Tempo chat (TempoFast / TempoDeep) — the weak-signal chat tiers (on the air; published thresholds are bench figures, and on-air reports are wanted).
Stuck on something? Start with Troubleshooting.
This page is synced from docs/quick-start.md in the Nexus repo. Corrections belong there.